Nothing makes custom tools complete like a custom user interface to accompany them. Unfortunately for me, few MEL commands take as many attempts to get desired results as the ones used to make a good looking UI. I usually start by creating the type of working environment we developed in the last exercise. This example will require those conditions again.
To start with, we'll need a .mel file in a directory you can easily find and edit later. For me, this file is "F:\Maya\mel\myWindow.mel". Your directory will probably be different.
Create a shelf button that sources this file and then calls the procedure "makeWindow". (Don't forget to reverse the slashes in your directory path inside your source command.) Your shelf button commands should look like this:
source "F:/Maya/mel/myWindow.mel";
makeWindow;
(With your own directory of course.)
If you hit your new shelf button, you should get the error "Error: line 2: Cannot find procedure "makeWindow".
That's because we haven't written it yet. If you copy the code from the next table into your "myWindow.mel" file and save it, the next time you press your new shelf button you'll get the following popup window.
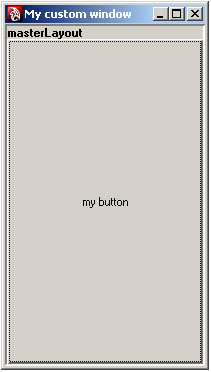 |
global proc makeWindow()
{
if (`window -exists myWindow`) deleteUI myWindow;
window -title "My custom window " -rtf true myWindow;
frameLayout -w 200 -h 250 masterLayout;
//all UI sits in here/////////////////////////
button -label "my button" newButton; // make a placeholder button //
showWindow myWindow;
} |
How does this work?
The first thing we do inside our procedure definition is remove the last version of the UI from the scene. This prevents confusion for you and for Maya and should not be taken lightly. It's the golden rule of UI development and should be the first command in any UI procedure. Next we use the window command to begin scripting the UI. It is necessary to have some form of layout in every UI, so for this one we use the frameLayout command to give order to chaos. We place a button in the frame to get some sense of context, and then use the showWindow command to make Maya draw the whole thing. The window actually exists and is editable and query-able before this last step, but what good is a UI if no one knows its there?
The next step is to examine the purpose of your new UI and draw out what you want the final result to look like. For the purpose of this example I've chosen a tab layout. This places a series of frames in front of each other like pages in a book, or folder tabs in a file cabinet. I'm going to continue using my procedure makeWindow to make this new tab layout design, with new additions highlighted below. The results are on the left side of the table.
 |
global proc makeWindow()
{
if (`window -exists myWindow`) deleteUI myWindow;
window -title "My custom window " -rtf true myWindow;
frameLayout -w 200 -h 250 masterLayout;
rowColumnLayout -nc 1 -cw 1 200;
//all UI sits in here/////////////////////////////////////////
tabLayout tabList;
//begin contents of first tab//////////////////////////////////////////
string $tab1 = `columnLayout -w 200 -h 240 firstTab`;
button -label "my button" newButton; // make a placeholder button //
setParent..;
//begin contents of second tab/////////////////////////////////////////
string $tab2 = `columnLayout -w 200 -h 240 secondTab`;
button -label "my 2nd button" newButton2; // make a placeholder button //
setParent..;
//return to masterLayout////////////////////////////////
setParent..;
//label tabs and build////////////////////
tabLayout -edit
-tabLabel $tab1 "One"
-tabLabel $tab2 "Two"
tabList;
showWindow myWindow;
} |
How does this work?
The first new line in the code tells Maya that the next layout needs to be in a column, or vertical list, and that there will be only one column with a width of 200 pixels. Then I begin my tabLayout command and call it tabList. I name it because I know that I'll need to modify it later. Inside my first tab I tell Maya to place everything in a columnLayout of 200 pixels. Now I have a place to put the button we made earlier. Since Maya now has a better understanding of the layout we're after, it resizes the button to the smallest possible size that still fits the label "my button". I finish this level of the layout with the setParent.. command. This command tells Maya that the next layout commands are not to fit inside the current working layout. Think of it as a way to sort of close brackets in your layout. The command setParent has some other parameters that you can read about in the MEL command reference, but we won't be using them here.
Then I made a duplicate of that code with some minor name changes to create the second tab. At the end of the procedure, just before I call the showWindow command, I edit the tab layout. This is done by useing the tabLayout command with the -e flag for editing. I do this to rename the tabs that I generated earlier using string variables. Tabs have to be edited in this way because there's currently no way to name your tabs as you create your tab layout.
So far, tabs and buttons are the only selectable features of our window. There are many more types of controllers; you can read about all of them in the MEL command reference in the catagory controls. For the next version of makeWindow, I've added three more types of controls. The new code is again highlighted.
 |
global proc makeWindow()
{
if (`window -exists myWindow`) deleteUI myWindow;
window -title "My custom window " -rtf true myWindow;
frameLayout -w 200-h 250 masterLayout;
rowColumnLayout -nc 1 -cw 1 200;
//all UI sits in here////////////////////////
tabLayout tabList;
//begin contents of first tab///////////////
string $tab1 = `columnLayout -w 200 -h 240 firstTab`; //create frame for first tab contents///////
frameLayout -w 200 tab1contents;
//create layout for new frame///////////////
rowColumnLayout -nc 1 -cw 1 190;
button -label "my button" newButton;
checkBox -label "use this option" optionCheck;
floatSliderGrp -min 0 -max 10 -w 200 newSlider;
radioButtonGrp -nrb 3 -label "Colors" -cw 1 40 -cw 2 40 -cw 3 40 -labelArray3 "Red" "Blue" "Green";
setParent..;
//return to frame contents//////////////////
setParent..;
//return to first tab contents//////////////
setParent..;
//begin contents of second tab//////////////
string $tab2 = `columnLayout -w 200 -h 240 secondTab`;
button -label "my 2nd button" newButton2; // make a placeholder button //
setParent..;
//return to masterLayout////////////////////
setParent..;
//label tabs and build//////////////////
tabLayout -edit
-tabLabel $tab1 "One"
-tabLabel $tab2 "Two"
tabList;
frameLayout -e -w 200 tab1contents;
showWindow myWindow;
} |
As you can see, making custom UI can be a long iterative process. Although you may not get the expected results from each type of control at first, the results can be very rewarding and worth the effort. You may recognize some of the controls as similar to ones found in other editors in Maya. If you use Maya's menu's to open the preferences window under Window> Settings/Preferences>Preferences you'll see many radio buttons and checkboxes. In the same window, if you change your category to "Display" you'll see a few sliders like those in the UI pictured above. The point is that Maya builds the UI that you're already used to with the same code that we're using here. For the most part, if you see a UI feature that you like in Maya you may be able to recreate that in your own custom UI.